MIG Welding for Beginners: A Step-by-Step Guide
MIG (Metal Inert Gas) welding, also known as Gas Metal Arc Welding (GMAW), is a welding process that uses a continuously fed solid wire electrode and a shielding gas to join two pieces of metal. This process is commonly used in industrial, automotive, and DIY settings due to its efficiency and ease of use.
Safety Requirements for MIG Welding:
- Protective Gear: Wear appropriate protective gear, including a welding helmet with a proper lens shade, flame-resistant clothing, welding gloves, and closed-toe shoes to protect against sparks, heat, and UV radiation.
- Ventilation: Ensure proper ventilation in the welding area to prevent the accumulation of harmful welding fumes and gases. Work in a well-ventilated space or use local exhaust ventilation to remove welding fumes from the work area.
- Eye Protection: Use a welding helmet with a suitable shade to protect your eyes from the intense light produced during the welding process.
- Fire Safety: Keep a fire extinguisher nearby and clear the work area of any flammable materials to prevent the risk of fire.
- Electrical Safety: Inspect the welding equipment regularly, use a ground clamp to secure the workpiece, and avoid contact with live electrical parts to prevent electrical hazards.
- Training and Knowledge: Receive proper training and familiarize yourself with the welding process, safety procedures, and equipment operation before attempting any welding tasks.
Adhering to these safety requirements is essential for preventing accidents, injuries, and health hazards during the MIG welding process. Always prioritize safety and follow the recommended safety guidelines and best practices to ensure a safe and successful welding experience.
Welding Gloves
When it comes to Mig and Tig welding, investing in high-quality gloves is crucial. I highly recommend opting for thin, flexible gloves, like the ones displayed on the left. Unlike the bulky welding gloves you might be familiar with, these soft, thin gloves provide exceptional dexterity, allowing you to have a better feel for your work.
At my store, you can find these premium gloves available in a convenient bundle of two pairs for the price of one. Don't compromise on your welding experience - prioritize comfort and precision with these specially crafted gloves.
Welding Hoods
When it comes to welding hoods, it's crucial not to compromise on quality. Both options showcased in the Amazon links to the left are excellent choices, providing top-notch safety features. Having personally tested both, I lean towards the Speedglass hood, primarily due to its superior comfort. However, both models exhibit high responsiveness and reliable performance.
The issue with cheaper auto-darkening hoods lies in their slower and inconsistent response times. Opting for a well-built hood is paramount as it ensures immediate darkening before any harmful light reaches your eyes. Invest in your safety and comfort with a dependable welding hood that guarantees optimal protection during your work.
Welding Jackets
Another indispensable safety gear item is a premium welding jacket, like to the one displayed on the left, available for a great price via Amazon. When selecting a welding jacket, prioritize those constructed primarily from cotton or leather, featuring a button-up design instead of a zipper. Ensure that the sleeves fit snugly at the cuff to seamlessly accommodate your gloves, and opt for a high collar that can be fully secured.
Remember to avoid wearing synthetic materials such as nylon and polyester. These materials are prone to catching fire and can potentially melt onto your skin, leading to severe injuries. Prioritizing the right materials in your welding jacket can significantly enhance your safety and protect you from potential hazards in the welding environment.
More than you want to know about steel
Before We Get Too Deep into Welding, Let's Chat About the Go-To Material: Steel
Steel is an alloy of iron and carbon, and it is one of the most widely used materials in the world due to its strength, versatility, and relatively low cost. However, there are various types of steel, each with its own unique properties, which make it suitable for different applications. Here are some of the common types of steel that you should know about as a beginner.
-
Carbon Steel: This is the most basic and widely used form of steel, consisting primarily of iron and carbon. The carbon content in carbon steel typically ranges from 0.05% to 2.0%. Higher carbon content generally results in increased hardness and strength, but it also reduces the steel's weldability and ductility. Carbon steel is commonly used in construction, machinery, and automotive industries.
-
Alloy Steel: Alloy steel is made by adding elements such as manganese, nickel, chromium, or vanadium to carbon steel. These added elements enhance specific properties of the steel, such as strength, toughness, and corrosion resistance. Alloy steel is commonly used in the production of high-strength, low-alloy (HSLA) steel, which finds applications in structural components and machinery.
-
Stainless Steel: Stainless steel is a type of alloy steel that contains a minimum of 10.5% chromium, which provides it with excellent resistance to corrosion and rust. Depending on the specific composition, stainless steel can be further classified into various grades, such as austenitic, ferritic, martensitic, and duplex stainless steels. Stainless steel is commonly used in kitchen utensils, cutlery, appliances, and in industries where corrosion resistance is crucial, such as in the food processing and chemical industries.
-
Tool Steel: Tool steel is a type of high-carbon steel that is specifically designed for the production of tools such as cutting, drilling, and shaping tools. It has excellent hardness, wear resistance, and heat resistance, making it suitable for applications that require high strength and durability, such as in the manufacturing and machining industries.
-
High-Speed Steel (HSS): High-speed steel is a subset of tool steel that can withstand high temperatures without losing its hardness. It is commonly used in the production of cutting tools like drills, taps, and milling cutters, where high-speed machining operations are required.
Understanding the basic characteristics and applications of these different types of steel is essential for selecting the most appropriate material for a particular application or project.
If you're curious about different types of metals, you can dive into my book for all the juicy details!
For the purpose of this article, let's assume you're working with mild carbon steel. First and foremost, cleanliness is key for your project, as new steel often comes with an oily film that requires removal, either with a detergent and warm water or a solvent like mineral thinner. In the case of old steel, rust and paint must be scraped off, while both new and old steel might feature a layer of mill scale—a flaky surface of iron oxides from the manufacturing process—that also needs to be eliminated. It's important to note that mill scale, along with coatings, oils, and rust, can all contaminate your welds and increase the toxicity of the smoke.
Both of these 5" grinders available on Amazon offer remarkable value. They exhibit low vibration, exceptional balance, and are built to serve you reliably for years. When it comes to grinders, it's crucial not to compromise on quality.
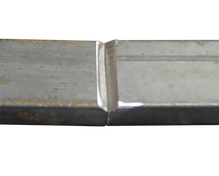
part of the preparation of your steel may include grinding a bevel or chamfer into the edges of the pieces you are going to join. Beveling the edge of steel before welding serves several purposes, including allowing for better weld penetration, providing a larger surface area for the weld, ensuring a stronger and more durable joint, and helping prevent weld defects such as lack of fusion or incomplete joint penetration. Beveling also helps in the proper deposition of weld metal and facilitates better control over the welding process, resulting in a more structurally sound and reliable weld joint.
As a general rule is to grind your edges down at a 45-degree angle, reducing the thickness to about half of its original size. As an example, a piece originally 1/8" thick should be ground down to 1/16" at the bottom edge. I typically follow this approach for all types of steel and various joints over 1/16" thick. Common types of joints you'll encounter include:
-
Butt joint: This is a type of joint where two pieces of metal are joined along their edges in the same plane. It is one of the most common types of weld joints.
-
Corner joint: This joint is created when two pieces of metal intersect at an angle to form a corner. It is often used in structural applications where two metal pieces meet at right angles.
-
Lap joint: In this joint, one piece of metal overlaps the other, and the weld is made on the surface where the metals overlap. It is commonly used for joining two pieces of metal with varying thicknesses.
-
T-joint: This joint is formed when one piece of metal is welded perpendicularly to the surface of another piece of metal, creating a "T" shape. It is often used in structural and framework applications.
-
Edge joint: This type of joint is created when two pieces of metal are joined along their edges, with the weld placed on the edge where the two pieces meet. It is commonly used in sheet metal work and other applications where the metals are placed in an overlapping manner.
Let's talk welders.
Selecting the right MIG welder might seem overwhelming, especially with an array of unfamiliar terminology. Allow me to simplify it for you.
Output amperage:
Output amperage refers to the measurement of the electrical current that a welding machine delivers to the electrode. It is a crucial parameter that determines the heat input and, consequently, the strength and quality of the weld. Amperage settings can vary depending on factors such as the material thickness, type of metal, and welding technique used. Adjusting the amperage appropriately is essential for achieving good results and ensuring a strong weld joint. For home use and light fabrication, a 140-180 amp welder is perfect. That allows you to weld up to 1/4" thick mild steel.
Transformer vs Inverter:
-
Transformer Welder: A transformer welder relies on a transformer to convert the input power supply (typically AC) to the desired voltage and current for welding. These welders are known for their robustness and reliability, often suitable for heavy-duty applications. However, they tend to be larger, heavier, and less energy-efficient compared to inverter welders.
-
Inverter Welder: In contrast, an inverter welder uses advanced electronics and inverter technology to convert the input power supply (AC) into a high-frequency current and then subsequently to the desired welding voltage and current (DC). Inverter welders are known for their compact size, lightweight nature, and energy efficiency. They provide greater control over the welding arc, making them suitable for various welding tasks, including those requiring precise and intricate welds.
Duty Cycle:
A welder's duty cycle is a critical specification that indicates the amount of time a welding machine can operate within a specific time frame without overheating. It is typically expressed as a percentage and is based on a 10-minute cycle. For instance, a 60% duty cycle at a given amperage means that the welding machine can run continuously for 6 minutes within a 10-minute period before it needs to cool down for the remaining 4 minutes.
Here's an example to illustrate this concept:
If a welder has a duty cycle of 60% at 200 amps, it means that the machine can operate at 200 amps continuously for 6 minutes within a 10-minute period. After the 6 minutes, the machine needs to rest and cool down for the remaining 4 minutes to prevent overheating.
Understanding the duty cycle is crucial for selecting the right welding machine for specific applications. Higher duty cycle machines are suitable for long-duration welding tasks and heavy-duty applications, whereas lower duty cycle machines are more suitable for intermittent or light-duty welding tasks.
110v VS 220v:
The primary difference between a 220V welder and a 110V welder lies in their power requirements and capabilities. Understanding these differences can help you choose the right welder for your specific welding needs. Here are some key distinctions and benefits of each:
-
Voltage and Power Output:
- 220V Welder: These welders typically require a higher voltage power supply and can deliver higher power output. They are suitable for heavy-duty welding tasks that require higher amperage, such as welding thicker materials and performing continuous or long-duration welding operations.
- 110V Welder: These welders operate on a standard household voltage and are suitable for lighter welding tasks and small-scale projects. They are generally more portable and convenient for DIY enthusiasts, hobbyists, and light welding applications.
-
Welding Performance:
- 220V Welder: Due to their higher power output, 220V welders offer better performance when working with thicker metals, providing deeper penetration and faster welding speeds. They are ideal for professional welders and industrial applications that demand high-quality and efficient welds.
- 110V Welder: While 110V welders are not as powerful as their 220V counterparts, they can still handle various light to medium welding tasks, including automotive repairs, maintenance work, and small-scale fabrication projects.
-
Portability and Convenience:
- 220V Welder: These welders are often larger and heavier, which can make them less portable compared to 110V welders. They are more commonly used in fixed locations or workshops with dedicated power supplies.
- 110V Welder: 110V welders are typically more compact, lightweight, and portable, making them suitable for use in different locations, including home workshops, garages, and job sites where a 220V power supply might not be readily available.
When deciding between a 220V welder and a 110V welder, consider the specific welding requirements, the thickness of the materials you will be working with, the available power supply, and the intended usage. Both types of welders have their own advantages and are suitable for different applications, so it's essential to choose the one that best aligns with your welding needs and environment.
MIG VS Flux core wire:
Flux-cored arc welding (FCAW) and gas metal arc welding (GMAW), also known as MIG (metal inert gas). The main difference between flux-cored wire and MIG wire lies in the composition of the wire and the presence of flux. Here's a breakdown of their differences:
-
Flux-Cored Wire:
- Flux-cored wire contains flux compounds within the hollow wire electrode, which melt during the welding process to produce a shielding gas and a slag that protects the weld pool from atmospheric contamination.
- FCAW is often preferred for outdoor and windy conditions as the flux provides better protection against atmospheric elements and prevents the weld from contamination.
- Flux-cored wire welding can be performed without an external shielding gas, although some types of flux-cored wire may still require a shielding gas for certain applications.
-
MIG Wire:
- MIG welding uses a solid wire electrode that requires an external shielding gas, such as argon or a mixture of argon and carbon dioxide, to protect the weld pool from atmospheric contamination.
- MIG welding produces clean and precise welds with minimal slag, making it suitable for applications where a clean finish is crucial.
- MIG welding is typically used for thinner materials and in indoor or controlled environments where the shielding gas can provide adequate protection.
Key Differences:
- Flux-cored wire welding is more tolerant to windy and outdoor conditions due to the presence of flux, whereas MIG welding is generally more suitable for indoor applications.
- Flux-cored wire welding can offer deeper penetration and higher deposition rates compared to MIG welding, making it suitable for welding thicker materials and performing heavy-duty tasks.
- MIG welding produces cleaner and more precise welds, making it a preferred choice for applications that require a clean finish and minimal post-weld cleanup.
When choosing between flux-cored wire and MIG wire, consider the specific welding requirements, the type of materials you will be working with, and the environmental conditions of the welding site to determine the most suitable welding process for your application. For the purposes of this article we will be focusing on MIG.
Input Amperage:
The input amperage of a welder refers to the amount of electric current that the welding machine requires from the power supply to operate effectively. This specification is crucial for understanding the power requirements of the welder and ensuring that the power source can supply the necessary current for the welding process. The input amperage is typically measured in amps (A) and is one of the key specifications provided by the manufacturer of the welding machine.
Here are some important points to understand about the input amperage of a welder:
-
Power Supply Compatibility: The input amperage specification helps determine whether the welding machine is compatible with the available power supply. It is essential to ensure that the power supply can deliver the required current without overloading the circuit.
-
Circuit Breaker Rating: The input amperage specification also assists in selecting the appropriate circuit breaker and electrical wiring for the welder. Choosing the right circuit breaker rating based on the welder's input amperage helps prevent electrical overloads and ensures safe operation.
-
Power Consumption: Understanding the input amperage of the welder is essential for estimating the power consumption and electrical costs associated with the welding process. Higher input amperage often translates to greater power consumption, which can impact energy costs and overall operational expenses.
-
Duty Cycle Considerations: The input amperage of the welder is closely related to the welder's duty cycle, which indicates the amount of time the welder can operate within a specific time frame. The input amperage influences the heat output and overall performance of the welding machine during different welding tasks.
By paying attention to the input amperage of a welder, you can ensure that the electrical system can support the welding machine's power requirements, thus enabling safe and efficient welding operations. It is crucial to consult the manufacturer's specifications and guidelines to determine the appropriate input amperage for your specific welding needs.
Most 110V welders typically require a 15-20A circuit, which can be found in many residential settings. While 20A circuits may not be as common as 15A circuits, some households do have 20A outlets. To determine the available circuits in your breaker panel, check the labeling on the breakers.
When using an extension cord with a 110V welder, it is crucial to use a 10-gauge cord that is 50 feet long or less. This ensures that the welder receives adequate power without the risk of overheating or voltage drop, which can affect the performance of the welder. Always adhere to the manufacturer's guidelines to prevent electrical hazards and ensure the proper functioning of the welder.
Shielding Gas:
Various types of shielding gases are available for MIG welding, each offering distinct benefits and suitable for specific applications. Here are some common types of MIG welding gases:
-
Carbon Dioxide (CO2): CO2 is a cost-effective and widely used shielding gas in MIG welding. It provides deep penetration, good weld bead wetting, and is suitable for welding thick materials. However, it can produce more spatter and a rougher weld appearance compared to other gases. CO2 is commonly used in automotive, construction, and general fabrication applications.
-
Argon (Ar): Argon is an inert gas that produces a stable and smooth arc with minimal spatter. It is often used in MIG welding for non-ferrous metals such as aluminum, copper, and stainless steel. Argon can also be mixed with other gases, such as CO2 or oxygen, to improve arc stability and penetration.
-
Helium (He): Helium is another inert gas that provides a hotter and more energetic arc compared to argon. It is often used in combination with argon or other gases to enhance the heat input and penetration during welding. Helium is commonly used for welding non-ferrous metals, particularly aluminum and copper alloys.
-
Oxygen (O2): Oxygen is sometimes added to the shielding gas mixture to improve arc stability, increase weld pool fluidity, and enhance the welding speed. It can also help with oxide film removal on the surface of the base metal. However, excessive oxygen can lead to increased oxidation and porosity in the weld.
-
Gas Mixtures: Various gas mixtures, such as argon-CO2 blends (e.g., 75% argon and 25% CO2), tri-mix gases (e.g., argon, CO2, and oxygen), and other customized blends, are available to achieve specific welding results. These gas mixtures are tailored to meet the requirements of different materials, thicknesses, and welding conditions. An Argon/Co2 blend is the most popular option, typically in a ratio of 75% argon and 25% CO2. This mixture offers a balance between the benefits of both gases. It provides better arc stability, reduced spatter, and improved weld appearance compared to using pure CO2. The argon component helps create a smoother arc and better arc starts, while the CO2 component maintains good penetration. This gas mixture is commonly used in various mild steel welding applications, including general fabrication, manufacturing, and repair work.
Both of the welders displayed on the left make fantastic entry-level options. The Hobart 140 is available in my store, while the Everlast Cyclone 140 is featured on Amazon. The Hobart operates on a transformer-based system, while the Everlast is an inverter machine.
Based on my extensive experience with it, I can vouch for the Hobart's exceptional reliability and ease of setup. I've found it to be a reliable and user-friendly choice. As for the Everlast 140, my experience with it has also been positive, and I was impressed by its excellent build quality. Both machines are great options for those getting started with welding.
What to look for when buying a MIG welder.
The welding market offers a lot of options, ranging from budget-friendly to premium, top-of-the-line machines. It's crucial to prioritize welders from reputable companies and steer clear of off-brand alternatives. Opting for a welder from a trusted brand provides significant benefits such as enhanced post-sale support, superior welding guns, and easier access to consumables.
By choosing a welder from a reputable company, you can expect:
-
Quality Assurance: Reputable companies adhere to stringent quality standards, ensuring that their products meet industry benchmarks through rigorous performance and durability testing.
-
Reliable Support: Established companies often provide better customer support, warranties, and service options, ensuring prompt and effective assistance for any technical issues or inquiries.
-
Product Durability: Welding machines from reputable brands are constructed using high-quality materials, enhancing durability and reducing the likelihood of frequent breakdowns.
-
Consistent Performance: Renowned brands invest in extensive research and development to ensure their machines consistently deliver optimal performance.
-
Safety Assurance: Welding equipment from reputable companies undergoes rigorous safety checks and certifications, adhering to industry safety standards and minimizing potential hazards during operation.
In essence, investing in a welder from a reputable company guarantees quality, reliability, superior performance, and safety.
some of the brands to look for are
Hobart, Miller, Lincoln, Esab, Thermal Arc and Everlast.
Let's get on with the welding already!
OK, so you have your safety gear, grinder, welder, steel, and some basic knowledge. Let's start putting it all together.
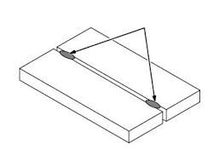
start with a basic butt weld. clean the steel and grind a beveled edge into both mating surfaces. fit them together but leave a small gap between the pieces, about the thickness of a credit card. you will need to have your welders ground clamp attached to one of the pieces, the easiest way to do this is to use a steel topped welding table, they work graet for small pieces and allows you to clamp your ground to the table instead of the work pieces.
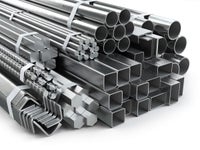
An excellent choice for an entry-level welding table is available on Amazon. This folding table is designed for convenient storage and boasts a sturdy build capable of supporting up to 400 pounds. Additionally, Amazon offers a range of welding coupons, perfect for accelerating your welding practice. These coupons arrive clean and prepped, making them an ideal option to kick-start your welding practice. Moreover, you can also source steel from local hardware stores, metal suppliers, and scrap yards.
The material thickness directly impacts the amperage required for welding. As a general rule, for every .001 inch increase in material thickness, 1 amp of output is necessary; for instance, .125 inch necessitates 125 amps. Choosing the appropriate wire size based on amperage is crucial. To streamline the process, opt for a wire suitable for the thickness you most commonly work with.
Consider the following wire size options based on amperage requirements:
- 30-130 amps: .023 inch
- 40-145 amps: .030 inch
- 50-180 amps: .035 inch
- 75-250 amps: .045 inch
Setting the voltage accurately is paramount as it influences both the height and width of the bead. In the absence of a chart, manual, or specifications, you can follow this method: while one person welds on scrap metal, an assistant should gradually decrease the voltage until the arc starts stubbing into the workpiece. Then, begin welding again and have the assistant increase the voltage until the arc becomes unstable and sloppy. Set the voltage midway between these two points for a suitable starting point.
Remember, the arc length is closely tied to the arc voltage. A shorter arc results in reduced voltage and yields a narrow, ropey bead, whereas a longer arc (higher voltage) produces a flatter, wider bead. However, excessive arc length also raises the risk of undercutting.
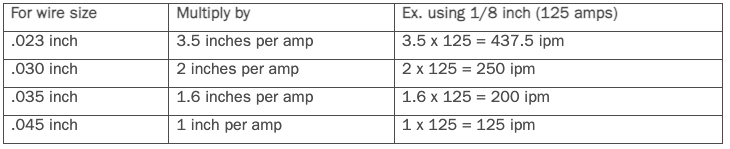
Determining the appropriate wire feed speed is essential as it directly controls amperage and the depth of weld penetration. Setting the speed too high can result in burn-through. If a manual or weld specification sheet isn't available, you can utilize the multipliers provided in the chart below to find a suitable starting point for wire feed speed. For example, for .030-inch wire, multiply by 2 inches per amp to determine the wire feed speed in inches per minute (ipm).
Check the owner's manual of your welder for the correct setup and gas pressures. Welders often have a decal inside the wire spool cover that provides all the recommended parameters. now let's run through a quick checklist before we start welding.
- proper safety gear and PPE
- gas bottle securely mounted and turned on
- ground clamp attached to the table or workpiece
- workpiece cleaned and beveled
- welder amperage and wire speed set
When I begin, I usually prefer to make a small tack weld at both the starting and ending points. It helps ensure stability and secure the intended positions.
A tack weld is a type of temporary weld used to hold metal pieces together temporarily during the welding process. It involves creating small welds at strategic points to secure the alignment and prevent the pieces from moving or shifting before the final welding is done. Tack welds are typically small in size and can be easily removed or incorporated into the final welds once the desired alignment is achieved.
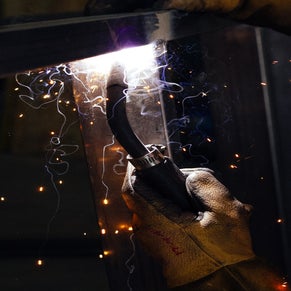
Position the torch: Hold the MIG torch with a firm grip, ensuring that the nozzle is aligned with the joint to be welded. Position your body and posture comfortably to maintain control during the welding process.
Start the arc: Depress the trigger on the MIG torch to initiate the welding process. As the wire electrode extends, it will make contact with the workpiece and create an arc. Keep the torch at a slight angle of around 10 to 15 degrees, tilted towards the direction of travel.
Control the travel speed: Move the torch steadily along the joint at a consistent speed, known as the travel speed. Aim for a speed that allows proper fusion between the welding wire, shielding gas, and base metal. Avoid moving too quickly or too slowly, as it may result in an uneven or weak weld.
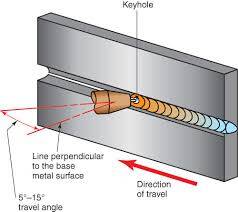

Maintain the arc length: Maintain a consistent distance between the MIG torch and the workpiece, known as the arc length. Typically, it is recommended to keep the arc length around ⅜ to ½ inch (about 10-12 mm) for MIG welding. This ensures proper heat transfer and helps create a stable arc.
Watch the bead formation: Observe the appearance of the weld bead as it forms. Aim to achieve a smooth, consistent bead with good penetration into the base metal. Adjust your travel speed, arc length, or heat settings as necessary to achieve the desired weld bead.
Pause at the end: As you reach the endpoint of the joint, pause for a brief moment before releasing the trigger. This helps to ensure proper fusion and transition from active welding to cooling.
Inspect the weld: After completing the weld, visually inspect it for any defects or irregularities. Check for full penetration, uniformity, and absence of cracks or porosity. Make any necessary adjustments and continue with the next weld if everything looks satisfactory.
When examining a MIG weld, here are the key aspects to look for in order to determine its quality:
- Penetration: Check the weld bead to ensure that it has sufficient penetration into the base metal. A good weld will exhibit a visible fusion between the base metal and the filler material, indicating that the weld has effectively bonded the two together.
- Bead Appearance: Look for a smooth and consistent bead formation along the joint. The bead should have an even width and height, without any discontinuities such as excessive build-up, undercutting, or convexity.
- Uniformity: A good MIG weld will display uniformity throughout its length. This means that the bead should have a consistent size, shape, and appearance along the entire joint, indicating that the welding process was carried out consistently without interruptions or variations in technique.
- Lack of Porosity: Inspect the weld for any signs of porosity, which are small gas pockets or voids trapped within the bead. Porosity weakens the structural integrity of the weld, so a good weld should have minimal or no porosity.
- Lack of Cracks: Check for any cracks in the weld bead or in the heat-affected zone. Cracks can compromise the weld's strength and durability. A good weld will be free from visible cracks.
- Proper Reinforcement: Examine the reinforcement on the backside of the weld, especially in the case of fillet welds. The reinforcement should be adequate but not excessive, providing sufficient strength without adding unnecessary bulk.
- Clean Appearance: A well-executed MIG weld will have a clean and tidy appearance. It should be free from excessive spatter, which are small metal fragments that can adhere to the weld and create an uneven or messy surface.
- Weld Profiles: Depending on the application and joint design, different weld profiles may be desirable. Assess whether the weld has the appropriate profile, such as flat, convex, or concave, according to the intended purpose and any applicable welding standards.
Congratulations! You have just completed your first weld. Here are a few things to keep in mind moving forward:
- Allow for Cooling: After completing a weld, allow the workpiece to cool down gradually. Avoid any abrupt cooling methods like quenching, as this can create unnecessary stress and potentially lead to cracking or distortion.
Grind or Dress the Weld (if necessary): Depending on the application or visual requirements, you may need to grind or dress the weld to achieve a desired surface finish or profile. Use appropriate grinding tools and techniques, ensuring that the weld integrity is not compromised.
- Improve and Learn from Each Weld: As a beginner, view each welding project as an opportunity to learn and improve your skills. Reflect on what went well and identify areas for improvement. Pay attention to feedback from experienced welders or instructors who can help guide your progress.
- Practice Welding Techniques: To enhance your proficiency, continue practicing and refining various welding techniques. Work on different joint configurations, materials, and positions. This hands-on experience will gradually improve your welding abilities.
Add comment
Comments